- Printer settings
- Where to begin
- How to print text on a printer
- How to print a photo on the printer
- How to print a document on a printer
- Document printout
- The correct sequence of installation and configuration of the printer to print
- Why Brother refuses to print or no longer copies
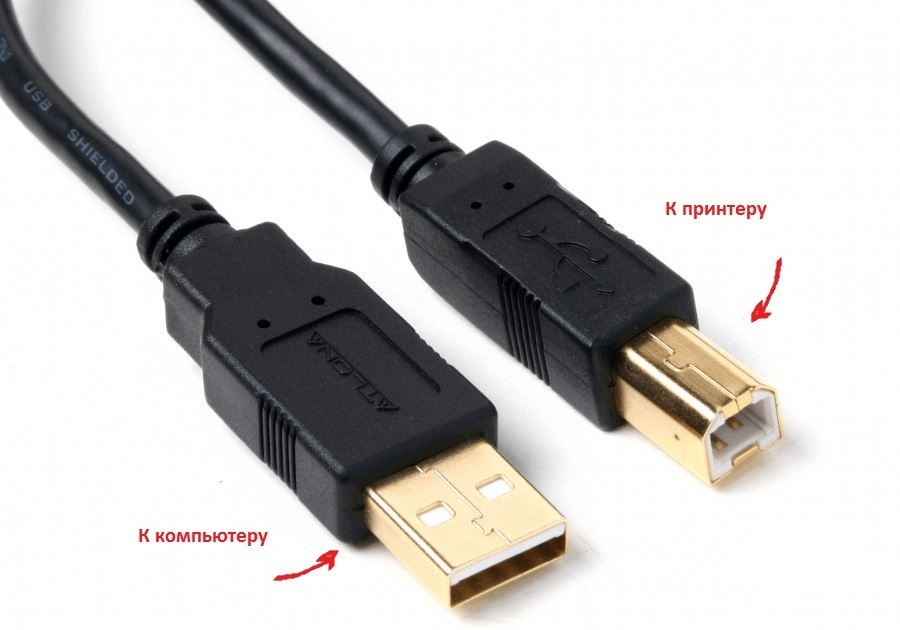
What it looks like USB cable (click to enlarge)
The first thing to do is connect the printer to the computer. The most simple option is a USB connection. How does the USB cable look like in the figure on the right (it may be missing in the kit - you will have to buy it in a nearby store). Connectors for connecting to a printer and a computer are different, but they can not be confused as there is only one type of USB connector on the computer.
The advantage of USB connection is the automatic installation of drivers . (driver - a program with the help of which the operating system (read computer) interacts with the device (read printer)). Without a driver, you can not print anything.
Automatic driver installation works even more effectively if the computer is connected to the Internet. In this case, if in operating system (OS) there will be no pre-installed driver for your printer, the OS will contact the Update Center. There the driver for your device will be found, downloaded and installed with a probability of 95-99%.
How to understand that the driver is installed and can be printed? The OS will issue a warning or notification that the device is installed and ready to go. The connected printer can be found at
In my case, this is the first icon - Epson L800. You can get into the “Control Panel” by right-clicking on the START button on the taskbar or by pressing the WINDOWS + X keyboard.
It happens that the operating system can not automatically install the driver. In this case, please use the following articles:
- How to install the printer from the disk - (recommended as most likely you have a disk bundled with the device).
The hardest part behind.
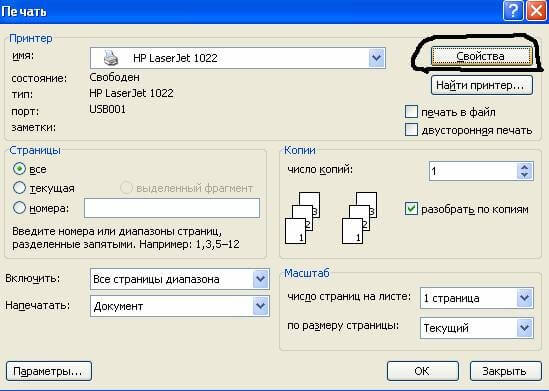
Printer settings
After the driver for the printing device is installed, you need to go in and check its settings. This is desirable to do so as not to be surprised at the printed result. We go to the already familiar address
We press right click on the icon installed printer and select "Print Setup".
For Epson L800, duplex printing can be enabled on the Layout tab.
Print with pleasure.
It happens, there are cases when printing a file is an important task. For example, if you need to prepare an abstract, or make yourself a copy of a document, whether for work or for government agencies.
Many people who have never actively worked with computer files, or, simply, have never encountered printers, do not know how to print any file on a printer, be it text or graphic. Let's try to figure it out.
Where to begin
First, we need to decide which file we need to print. You can practically print everything on your computer, starting with the application window, ending with a dot on the screen. Have you decided? Go ahead!
How to print text on a printer
In order to print any text, you need to create Text Document , using the text editor "Notepad", insert there the necessary passage of text, which, and, you need to bring to paper, and select the menu. By the way, I hope you did not forget to connect the printer itself to the computer, and plug the power cord into the outlet? If not, now go to the top menu of "Notepad" in the File, and there, select "Print". After this, printing should begin.
How to print a photo on the printer
If you have a digital color photo that you would like to print, I recommend doing it only if you have a special printer for photo printing. Otherwise, even if you have a color printer, the picture will not be the most interesting and colorful. If, nevertheless, you decide to print it this way, then you need to save an image to your computer, open it, and, as in the case with the test file, click File, and select Print. If you are wondering: how to print a picture on a printer, then this method will also suit you. In our case, between a simple picture and a photo, there are no differences.
How to print a document on a printer
Usually, documents are opened in the multifunctional text editor Microsoft Office. If, however, you use free analogs, such as LibreOffice or OpenOffice, then in order to print the text you need, you should repeat the actions as, and, in the case, work with Notepad, that is, click "File "And select" Print. " A new window will open in which you will specify the copy settings, how many copies, etc. Choose what you need and click "Print".
In the case of Microsoft Office, everything is a little more complicated, since in different versions , different interface. If you have installed the version of 2003, then you should repeat the steps described in the paragraph above, which says about the open analogues of this program. That is, simply select the File, and click Print.
AT latest version office, in order to select the print file, you need to click on the small circle, which is located in the upper left corner, and, already, there, select the item "Print file". After that, choose necessary settings and start printing.
It is very easy to print a document on a printer if you are guided in the program you are using and it has print output. Below is a basic guide to printing documents for most programs and operating systems.
Document printout
How to avoid printing problems
- Select the appropriate paper and ink. Before you begin printing, you will need to decide what type of paper you want to use. Choose thicker paper for more formal documents (such as invitations or resumes), and more subtle for flyers, flyers, announcements, and other prints for rough use or mass distribution. Make sure that this type of paper is suitable for your printer. Paper should be placed in the appropriate tray before printing. You also need to determine in advance whether you need a color or black and white print.
Make sure your printer is installed correctly. You will need a printer that is ready and able to print. This means that it must be properly connected to the computer, all necessary drivers must be installed, and the printer must be filled with both paper and ink or toner.
Do not forget to connect the printer to the outlet and turn it on!
In addition, you need to understand what type of printer you are using: inkjet or laser. These devices print in a different way , and some types of paper may be suitable for some printers and not suitable for others. It should also be borne in mind that most of the households used now are laser printers can not print in color.
First print one page. If you make a mistake or set the wrong print settings, you are unlikely to need ten unusable copies. Therefore, before starting a full print, print only one page and make sure that this is what you need.
Keep track of ink or toner levels in your printer. Do not start printing large and important projects if you are not sure whether you will have enough dye to complete it.
If printing does not start, make sure there is paper in the printer. Some printers have closed-type trays or multiple feed trays. Therefore, in the presence of paper in the desired tray better be sure additionally.
You need to print a text or photo, but you are using a printer for the first time and do not know where to start. Follow the simple HP printer setup tips.
In more detail about all settings of the HP printing will tell the following video:
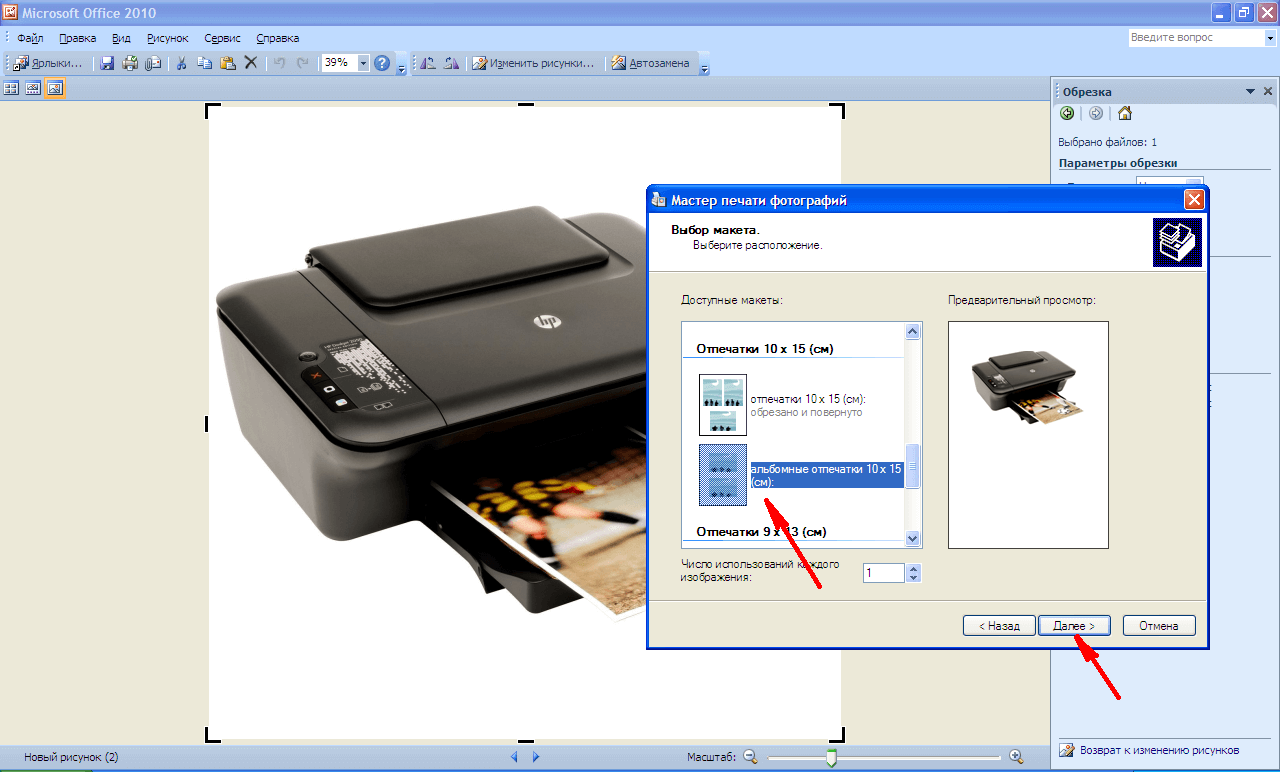
If you need to print color pictures or photos, you should set the settings for their size and quantity in the menu “Layout selection”. Then click “Next” to let the HP printer start printing.
If the printing device was not previously connected to the computer and you do not know how to set up the printer to print, then use the following hints.
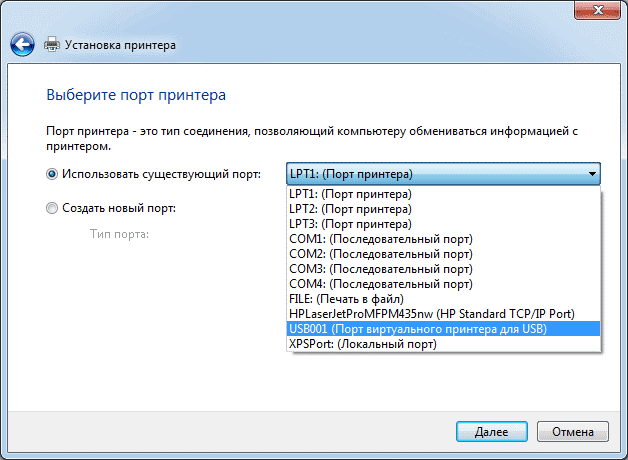
The correct sequence of installation and configuration of the printer to print
Last Windows versions they involve scanning new equipment connected to the computer and automatically setting up the printer for printing. But sometimes after self-tuning the printer never prints, and the Epson CX4300 MFP does not copy documents. Why does the automatic setup of the computer for printing not work and because of what the device has stopped normally? Try setting up your own Epson CX4300 for printing.
If the disc is lost or after a while it simply stops reading, then you should download the drivers from the official Epson website, choosing from the list the correct printer or MFP model, as well as the version and bit depth of Windows installed .
Want to download the driver for Epson, but do not know where and how - see the video:
Similarly, drivers for HP, Brother and other printers are downloaded, just go to the corresponding official website.
- In the installation wizard that opens, go through all the configuration steps, following the system prompts.
- At the end of the process, try sending the text or photo to print, following the above procedure.
For installation help, watch the following video:
Occasionally, you may encounter the problem of printing a Brother printer, which has repeatedly printed text and photos, but after a crash or reinstall windows The printed device has stopped working.
Why Brother refuses to print or no longer copies
In order to understand why the printer stopped printing from a computer, it is necessary to eliminate all possible faults.
To learn how to clear the print queue, watch the following video:
Instruction
Run a word processor Microsoft Word and load into it a document, the text of which must be printed in a book format.
Go to the “Page Layout” tab in the application menu and click the largest button in the “Page Setup” command group - “Fields”. Open a window with detailed settings page settings by selecting the lowest line in the drop-down list - "Custom Fields".
Find the inscription “several pages” in the “Pages” section on the “Fields” tab - a drop-down list is placed to the right of it, in which you should select the “Brochure” line. Another section will appear in this section (“the number of pages in the brochure”), in which you can set a limit on the number of pages in the book being created. By default, there are no restrictions, that is, the open document will be printed in full.
Adjust the size of indents between the text and the edges of the sheet in the "Fields" section. Depending on how you plan to stitch the created book, you may need to set a non-zero value in the Binding field. Word will automatically install the “landscape” page orientation, and you cannot change this setting.
If A4 sheets are used for printing, then skip this step, otherwise set the required size in the “Paper size” section placed on the tab with the same name.
Click the "OK" button and prepare the printer for printing - make sure that it is connected to the computer, plugged in and provided with a sufficient amount of paper and toner.
Send the document to print by calling the appropriate dialog by pressing the key combination ctrl + p.
Sometimes it is necessary to set up printing on a printer so that some kind of book or booklet can be made up of pages leaving the printer tray. To do this, it is enough to register certain instructions in the printer properties. How to do this let us examine the example of the most ordinary inkjet multifunction device (MFP) HP Deskjet F2400.
Instruction
Now in the properties window, go to the "Functions" tab and activate the following settings: "Duplex printing - Manual", "Booklet layout - Left-side binding". Click "OK", after which the window closes, and you will need to click the "Print" button.
Also common format is a document (.doc format ). For him, especially the newer version ( format .docx) requires the installation of a special software called word. The program is included with Microsoft Office. For normal operation, Microsoft Word 2007/2010 or even Microsoft Word 2003 (updated version only) is suitable. From a notebook to translate into this format is very simple. It is enough to select the text (by simultaneously pressing ctrl + a), and then copy / paste (first ctrl + c, then ctrl + v) and the book in е.doc format .
For convenient reading of the book from the computer, Portable Document Format (.pdf format ) is used quite often. The file is opened using the Acrobat Reader program, and a special converter is required to transfer it from other formats . For convenience, you can install Universal Document Converter. This method is suitable for almost all used formats . That is, initially it is better to transfer to any format from a simple text file or a document.
Related videos
Sources:
- how to change the format of the e-book
In computers, in contrast to typewriters, the process of creating and editing documents is separate from the process of printing them. The production of paper copies is engaged in a peripheral device - a printer. Therefore, if with regard to typewriters the question “how to type” would sound strange, then in relation to computers it relates to the field of basic knowledge.
You will need
- Computer and printer
Instruction
To make the process of creating a paper copy of a document normal, you must make sure that the printer is ready for use before sending it to print. First, it must be installed in your operating system and connected to
How to understand that the driver is installed and can be printed?Have you decided?
By the way, I hope you did not forget to connect the printer itself to the computer, and plug the power cord into the outlet?
Why does the automatic setup of the computer for printing not work and because of what the device has stopped normally?